Saturday, 16 May 2015

Coconut Cake with Apricot-Citrus Custard Filling and Matcha SMBC


This cake was submitted in April 2015 for Fondbites Bake Along's "Bake It Perfect" contest under the "Flavourful Cakes" categories. And I'm very happy to report that my entry was selected among the 12 finalists. I have submitted my entry for the finals. Will reveal that post soon after the results are announced ...

So far my experience with inventing and doing new flavour combinations has been quite low. I do like to browse and save some unique recipes and unusual flavors especially in pinterest but haven’t really got down to baking all of them. I own quite a lot of books too. So, when I saw the contest post on Fondbites Bake Along group for “Flavorful Cakes” I decided then and there to participate and finally come up with my combination and make use of all those books and sources I have.


After a lot of thinking, going through my books, pins, bookmarks and saved recipes, I realized how wide the selection is!! I wanted to make something simple yet yummy and also something my family would enjoy. Finally zeroed in on 3 components from 3 different sources and put them together. My entry is a Coconut Cake with Apricot & Citrus Custard Filling and a Matcha floavoured Swiss Meringue ButterCream (SMBC) frosting..


The cake in itself is a hearty and wholesome cake with just enough sweetness to satisfy us and the subtle flavour of rum just enhances the whole coconuty taste that is thrown at us like a bomb with the addition of coconut milk as well as toasted coconut. It is not a sponge cake recipe so its not really soft, it is more like a tea time cake(on its own). I have made a few changes to the original recipe but nothing too drastic. The Filling is a tangy one, in contrast with the sweet coconut cake and I was very satisfied with the way it turned out. The frosting could have been anything if you ask me, but the subtle and almost non-existent bitterness of the Matcha was so perfect and made the cake complete!
The whole cake takes a bit of time but with proper planning, it is fairly easy to make. I have tried my best to give proper steps as to how to go about the whole process. Hope it is helpful. So let’s get on with it..

Coconut Cake:
INGREDIENTS:
All Purpose Flour – 2 Cups
Baking Powder – 1 Tsp
Pinch of Salt
Unsweetened Coconut Milk – 1 cup/ 200ml
Unsalted Butter – 4 Tblsp
Eggs – 4
Granulated Sugar – 1 Cup
Light Brown Sugar – 1 Cup (loosely, not tightly packed)
Vanilla Extract – 1 Tsp
Dark Rum – 2 Tsp (Purely optional)
Shredded Fresh Coconut – ¾ cup (Desiccated Coconut can also be used)
METHOD
F:\Deepi\1 Food Photos\Cakes\Contest Coconut cake\edits\Step 1.jpg
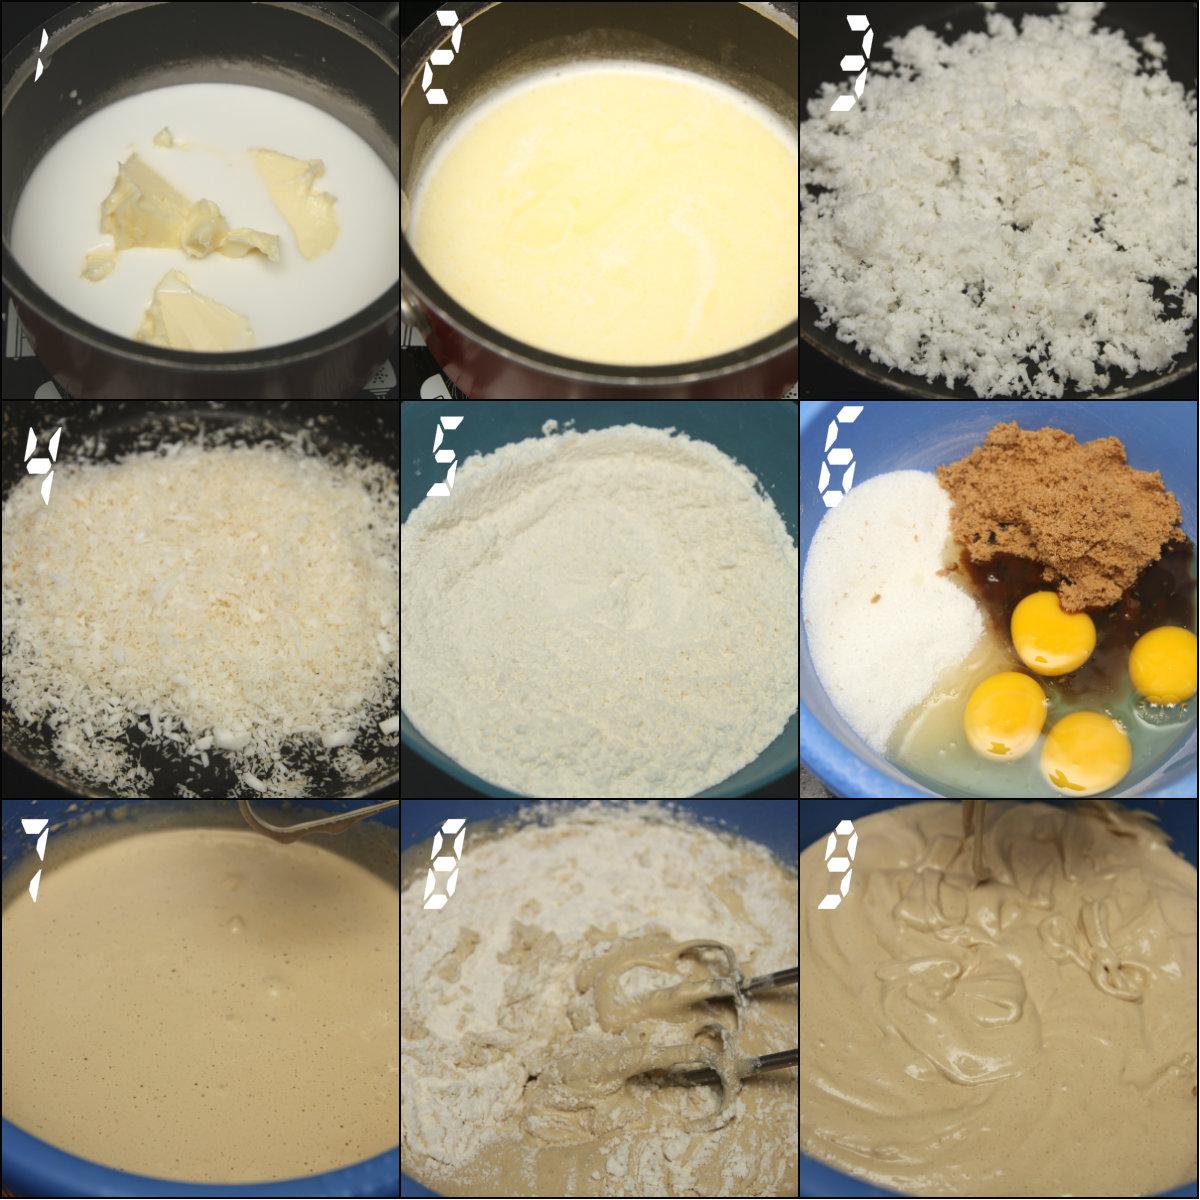
-Take a small saucepan, pour in the coconut milk and add the butter. Heat it until the butter is fully melted. You don’t have to boil it. (Pic 1& 2) Remove from heat and set aside, but keep it warm. Do not cool it completely.
-Take the scraped fresh coconut in a non-stick pan and toast it on low flame until all the moisture is gone and the coconut turns golden yellow. Be careful not to burn the coconut. (Pic 3 & 4)
-In a clean dry bowl, sift together all purpose flour, baking powder and salt. (Pic 5)
- In another large bowl (or in the bowl of your stand mixer) combine the eggs and both the sugars and beat on med-hi speed until the mixture is pale, thick and doubled in volume. (Pic 6 &7)
-Add the vanilla extract and dark rum and beat well.
-Add all purpose flour and beat on low speed just until the flour is fully combined. Do not over beat. (Pic 8 &9)
F:\Deepi\1 Food Photos\Cakes\Contest Coconut cake\edits\steps 2.jpg
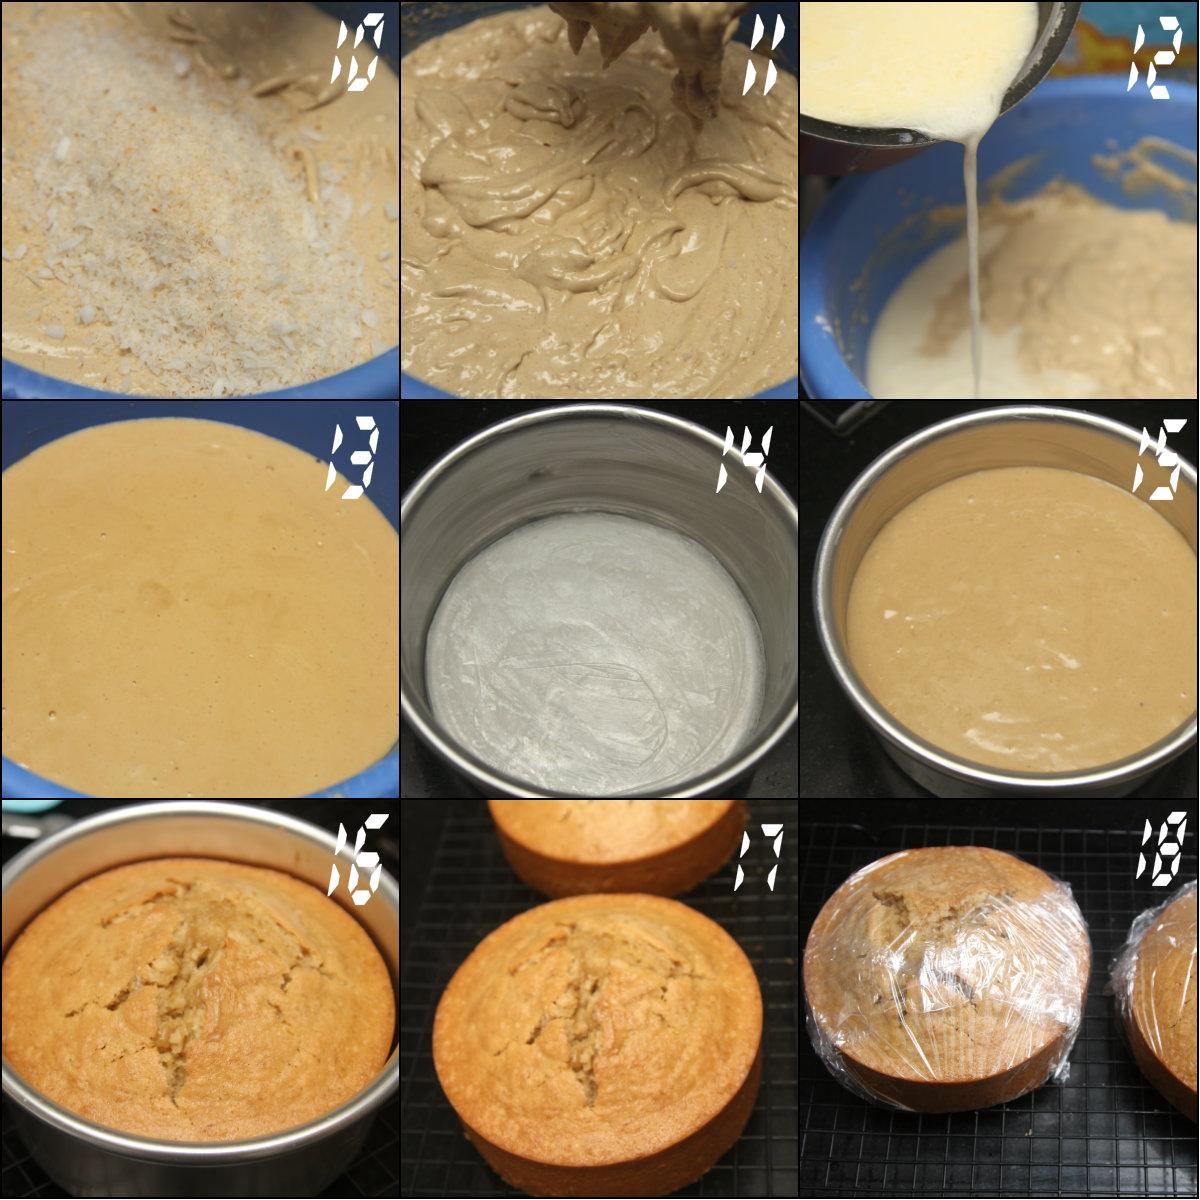
-Add in the toasted coconut and again beat on low only until its mixed thoroughly (Pic 10 & 11)
-Pour in the hot coconut milk-butter mix slowly but steadily and keep beating until it’s all in and the mixture looks smooth. (Pic 12 & 13) Scrape the sides and bottom of the bowl and stir everything together with a spatula.
-Preheat your oven to 180*C and prepare your pans. I wanted a tall cake, so I used a 6” round pan and since I have only one, I had to bake it twice. (Pic 14)
-Pour the batter in and bake for 50-55 mins, time may vary with pan size. (Pic 15 & 16)
-Cool the cakes on wire racks. And cling wrap them and refrigerate once completely cool. (Pic 17 & 18)
Apricot Citrus Custard Filling
Recipe courtesy- Joy of Cooking
INGREDIENTS:
F:\Deepi\1 Food Photos\Cakes\Contest Coconut cake\edits\sttep.jpg
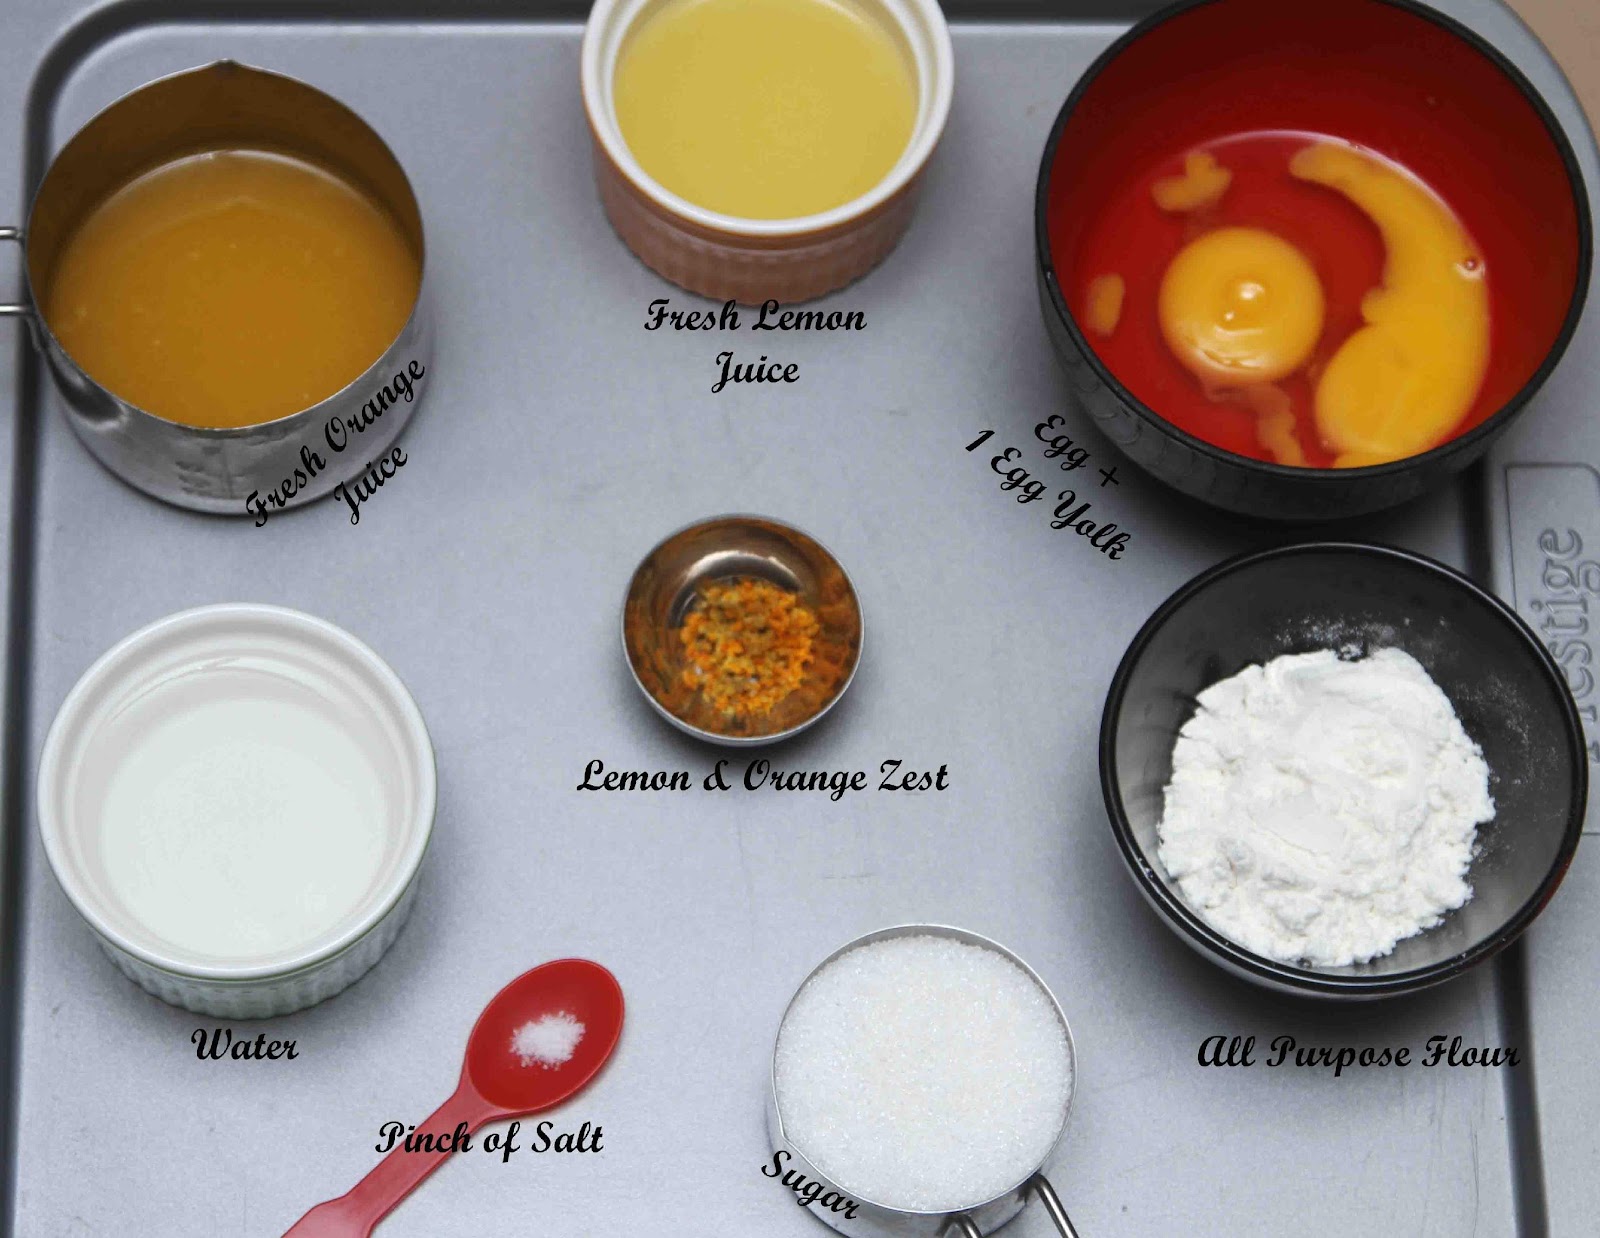
For the apricot puree:-
Dried Apricots – ½ cup
Water – 1 cup
Sugar – 1 Tblsp
For the custard base:-
Zest of 1 Lemon and ½ an Orange
Fresh Orange Juice – ½ Cup
Fresh Lemon Juice – 3 Tblsp
Water – 3 Tblsp
Sugar – 1/3 Cup
All Purpose Flour – 2 Tblsp
1 Egg + 1 yolk
METHOD:
F:\Deepi\1 Food Photos\Cakes\Contest Coconut cake\edits\steps3.jpg
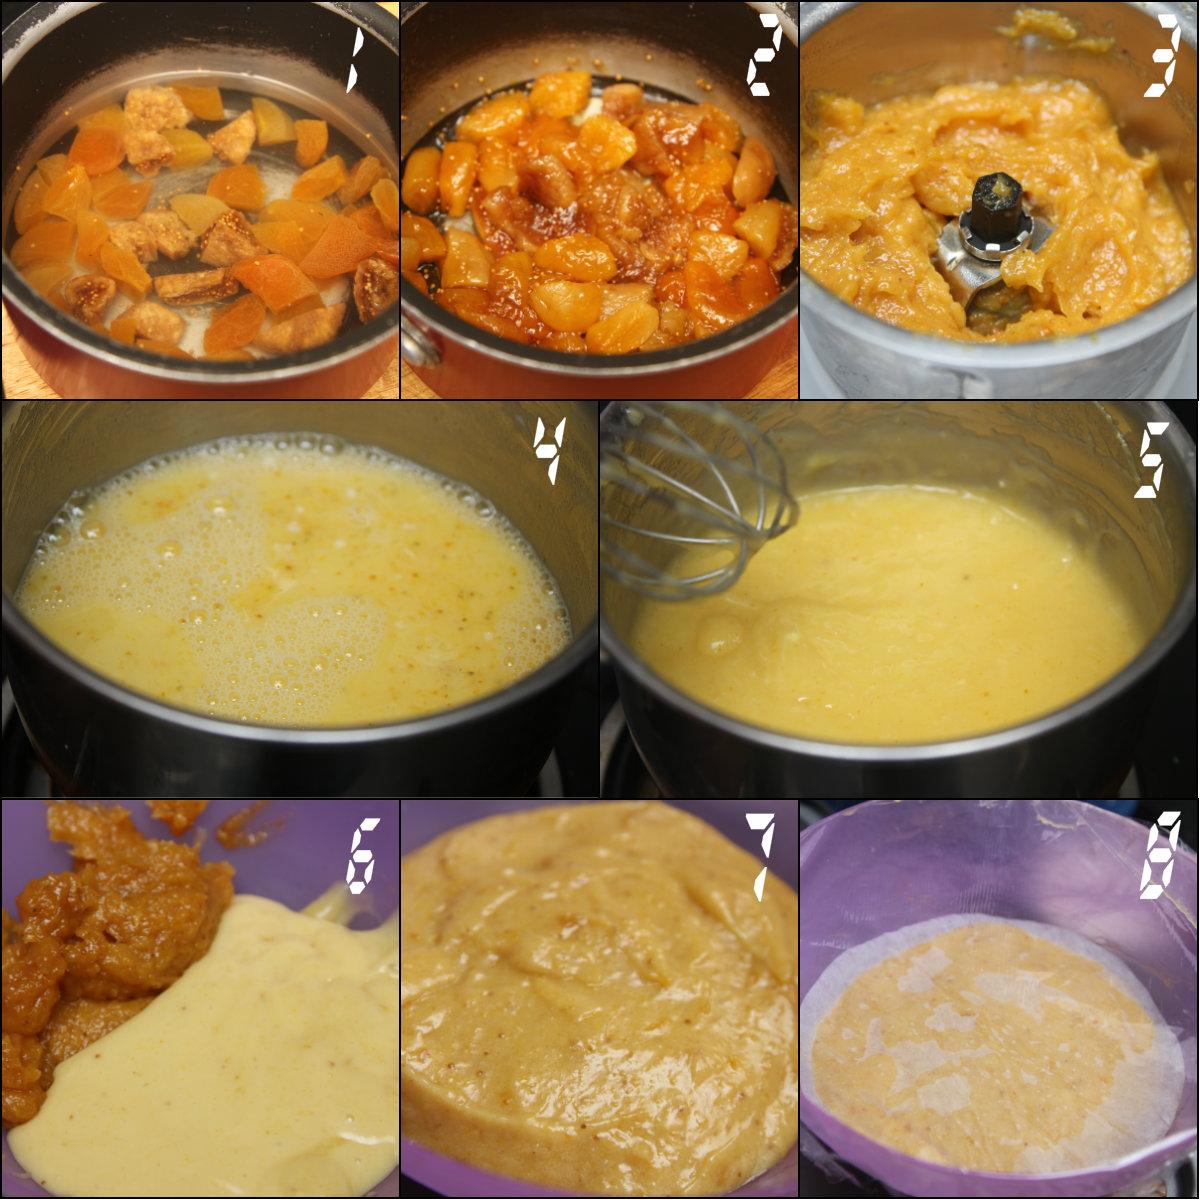
-In a small saucepan, combine the dried apricots and water. Simmer on low flame for about 20 to 25 mins. (Pic 1)
-Stir in the Sugar and continue to cook in low flame until the remaining liquid has turned into a glaze. This will take around 3-5 min. (Pic 2)
-Cool the mixture and puree it in your blender and set aside (Pic 3)
-In another saucepan, combine all the ingredients listed under “For the Custard Base”. Cook in medium flame, whisking constantly. Be careful as this burns really fast, so don’t take your eyes and hands off this. (Pic 4)
-Cook until the mixture has thickened and starts to bubble. Cook for 1 more minute, don’t stop whisking. Remove from heat. (Pic 5)
-Scrape the whole mixture into a big sieve and strain it into a bowl. You will have to push it through the sieve as it will be quite thick.
-To this add the pureed apricots and mix well. (Pic 6 & 7)
-Cover the surface of the filling with a wax/baking paper, cling wrap it and refrigerate. (Pic 8)
Matcha Swiss Meringue Buttercream:
Recipe adapted from Martha Stewart
INGREDIENTS:
Egg Whites – 5
Sugar – 1 ¼ Cups
Unsalted Butter – 340 g (cut into tablespoons)
Matcha Powder – 2 Tblsp (adjust according to taste)
A few drops of Vanilla Extract
METHOD:
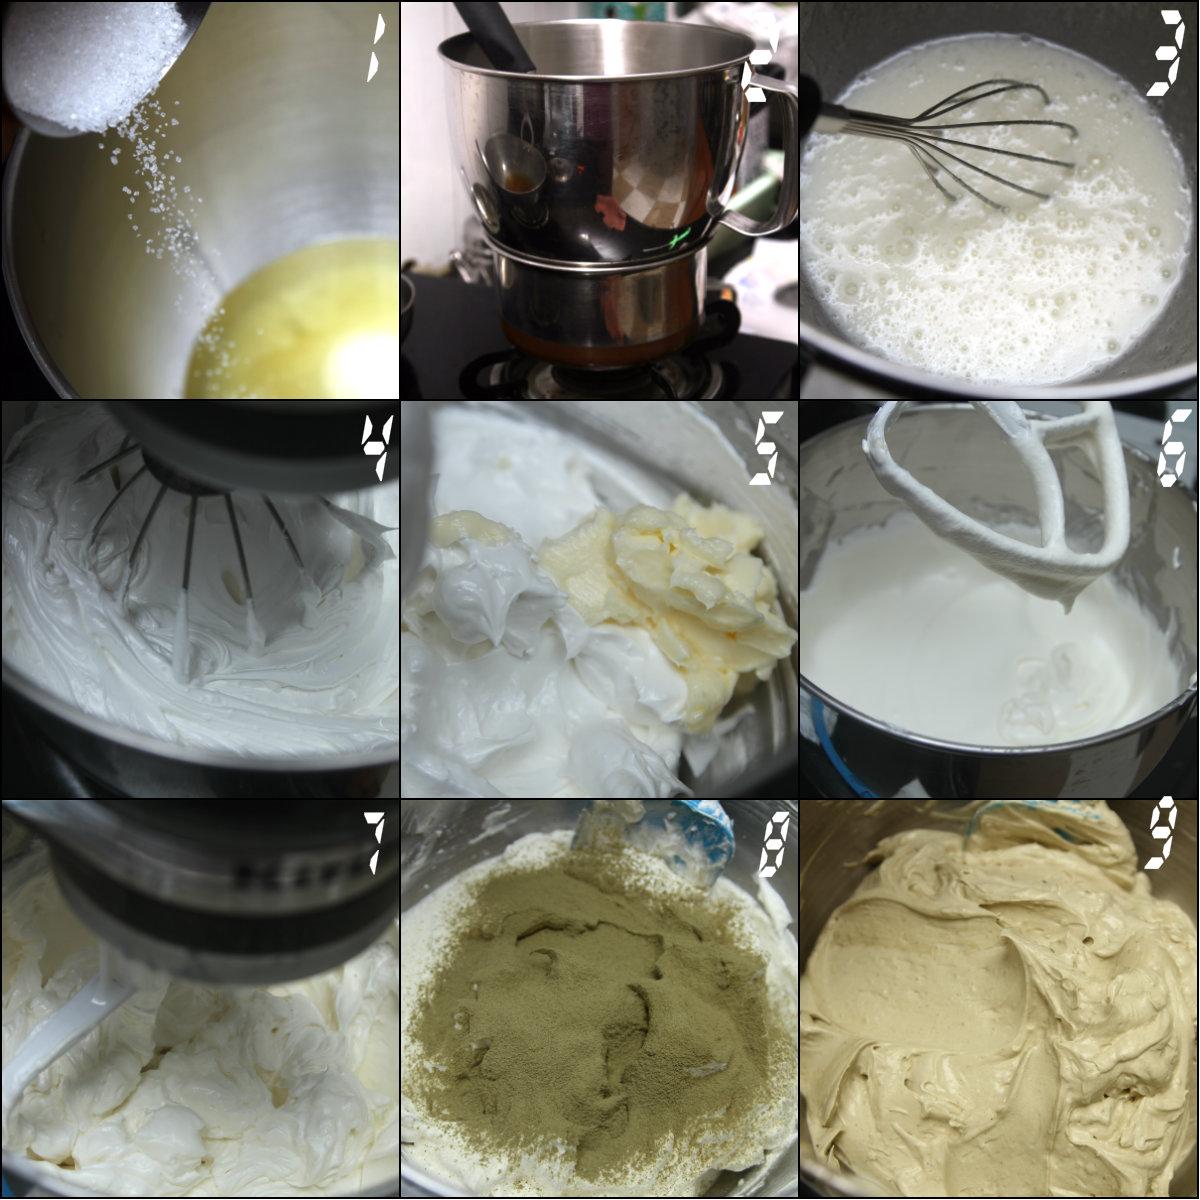
F:\Deepi\1 Food Photos\Cakes\Contest Coconut cake\edits\steps 4.jpg
-In the bowl of your stand mixer, combine egg whites and sugar (Pic 1)
-Place this over a pan of simmering water and ensure that the bowl is not touching the water (Pic 2)
-Cook, whisking constantly until the sugar has dissolved. The mixture should be warm to touch (160F or abt 70C) and completely smooth when rubbed between your index and thumb finger. Remove from heat. (Pic 3)
-Attach the bowl to the mixer and beat the mixture on high speed with the whisk attachment, until it holds stiff peaks. Continue beating for another 6 minutes. (Pic 4)
-Change to the paddle attachment and start beating in med speed, adding the butter several tablespoons at a time. Beat well after each addition. (Pic 5)
-After the addition of all the butter, the mixture may look curdled and soupy, mine did. (Pic 6) Just beat the mix in high speed for about 3 mins and will come to the correct consistency. Don’t worry. (Pic 7)
-Add the vanilla extract and sift in the matcha powder. Beat until well combined. (Pic 8 & 9)
-Beat the whole mixture in low speed to eliminate any air bubbles (I missed this step and ended up with a lot of air pockets in my frosting bag, so don’t skip this) The buttercream will be like satin.. So smooth and shiny!

-I split the buttercream into 2 batches and coloured one batch with 3-4 drops of green gel color. Just for a variation for the design. I left one batch as it is since the matcha had given a nice pastel shade of green and I wanted to show that.
ASSEMBLY:

-Take the cakes and filling from the refrigerator. Slice the domed tops and torte both the cakes.
-Place one half of the cakes on a cake board or a cake stand.
-Take a piping bag and cut the top of a little. Fill it with a little frosting and pipe a dam around the cake.
-Fill the rest with the filling and place another half of the cakes. Repeat. And repeat again.
-Crumb coat the cake and refrigerate. Decorate the cake as your mind wishes.


Hope you liked my Flavor Combination idea and my first detailed post with steps and pics. I am very glad I did this post. I feel really happy with the way everything turned out. Hope to do many more bakes like this ☺

Here is one last slice for you!!


Happy Baking!!

Thursday, 15 January 2015

Pongal- The Festival and The Sweet...

I have so far only blogged about baking and this is officially my first non-bake(?) post. This post is very special to me because I am writing this on request from a very dear friend of mine. You might know her as “The Inconsistent Chef” or as just Shyma Mathai. No matter how you know her, I’m sure if you have ever interacted with her, you would know that she has a huge heart and will go out of her way to help you, encourage you and be happy with each successful step you take. She wields magic at her fingertips and enthrals us with her wonderful blog The Wind Beneath My Wings . Do hop on to her blog for some amazing recipes. We met each other on Fondbites Bake Along group- one more thing I’m grateful to Subhashini & the group for, apart from all the knowledge I’m gathering over there. Even before Shyma chechi knew me, she used to comment and appreciate my photography & bakes that I used to post in the group. Not only mine, she takes time to encourage or appreciate all the bakers there, be it with a comment or a like. And I was in love with all her photos, bakes and her blog. This mutual appreciation brought us together and we became really good friends. Thank you chechi for being a good friend and a sister, and for just being who you are. And thank you for giving me this opportunity to write for you :)

Moving onto the post.. January is a festive month all over India. It marks the beginning of our Harvest season and is celebrated everywhere in our country under different names. In North India it’s primarily called “Makar Sankranthi”, though the name might change in a few states. Down South, it’s celebrated as Pongal in Tamil Nadu, Makara Sankranthi in Andhra Pradesh and Suggi in Karnataka. To my knowledge Kerala doesn’t have any special festival in the month of Jan, they do however celebrate Onam somewhere in the month of August as their Harvest festival. I am married into a Tamilian family and my in-laws celebrate Pongal with great fervor.


Pongal is celebrated on the 1st day of the 10th Tamil month known as “Thai” [pronounciation- “th” as in “THink” and “ai” as in the letter “i”, not Thai as in Thailand :P ] and marks the beginning of the Harvest season. So the festival holds more significance to farmers. It is usually celebrated for 4 days. The first day is celebrated as Bhogi where people burn their old and unwanted stuff, signifying purification of evil and cleansing their house. The 2nd day is the main Pongal day also known as Surya Pongal or Thai Pongal, where people worship the Sun God for blessing them with a bountiful harvest. 3rd Day is Maatu Pongal- Cows and other cattle are decorated and worshipped. The 4th and final day is Kaanum Pongal- where everyone goes out with their Family for sight-seeing or to carnivals, just to spend time with family.


Thai Pongal is one of the most important festivals for Tamilians. They celebrate it by getting together with family, wearing new clothes, jewelry and by having meals together. And what good is a celebration without food? Ven Pongal and Sakkarai Pongal are made in each and every Tamil household on this day. Ven Pongal is the savory version made with dal, pepper and rice whereas; Sakkarai or sweet Pongal is made from dal, rice and Jaggery. Today I’m going to share the recipe for Sweet Pongal which has worked for me every time in the past. My husband absolutely loves this sweet pongal. So here goes the recipe.

Sakkarai / Sweet Pongal:


Recipe adapted from Chandra Padmanabhan
Serves- 4-6

Ingredients:


Green Gram/ Moong Dal/ Paasi Paruppu – 1/2 cup
Uncooked Raw Rice- 1 Cup
Powdered Jaggery- 2 cups
Ghee- 5 Tblsp
Cashew Nuts – 10, broken
Raisins- 2 Tblsp
5 Cardamom+ 2 clove Powdered
A Pinch of Edible Camphor
A Pinch of Saffron Strands

Method:

Dry Roast Moong Dal in a Pressure Pan/Cooker for a couple of minutes.
Add washed rice + 3 & a Half Cups of water and pressure cook for 3-4 whistles.


Meanwhile take the jaggery in a pan, and add just enough water to immerse it and dissolve the jaggery. Let cool and strain to remove impurities. I used home-made jaggery which has ground badam and other nuts in it, which my Dad got from one of his colleagues in Delhi. So I didn’t strain it.


Once the pressure is released in the cooker, open and mash the rice and dal together. 
Keep it back on the stove in low flame and add the jaggery syrup, powdered cardamom+clove, saffron strands and the edible camphor to the mashed rice+dal and stir well. If you find the mix gettting dry, add ghee or if its too dry, add water or milk. Keep stirring and cook for about 5 mins or until u get the right consistency.


In a separate pan, add ghee and fry the cashews and raisins. Add this along with the saffron strands to the pongal and mix well.


Serve hot.


Do try this recipe ANY day you are craving for something sweet. Wishing everyone a Very Happy Pongal. Thank you Shyma chechi once again for giving me this opportunity :)

Monday, 5 January 2015

New Year, a Neapolitan Cake and some History

First and foremost, wish you all a Very Happy New Year 2015!! Hope this year brings nothing but happiness and takes all your sorrows away.. A New Year means a lot of things to a lot of people. A new beginning, a fresh start, a new goal or just to make everything a little better than last year. I am no different. I am not one to take resolutions and have strict determinations. But I do hope to make a difference somewhere in any small way I can. Achieve a few goals and set a few things straight. And what better day for a little introspection than 1st of Jan right? 


 Anyway, New Year's eve calls for celebration. Whether you are out and about with friends, partying into the new year, or at home, having fun with family, nobody goes through the midnight hour without celebrating.. So this year, we had a small family get together at home and being the baker of the family, I was put to the task of making a cake. Which was easy because I had already made up my mind when Subhashini posted the Neapolitan Cake recipe  in November, that this would be my new year cake! Just looking at the layers made me drool. I was fascinated with Neapolitan Cakes from the first time I laid eyes on them, back when I started baking. Every baking blogger worth their salt (sugar?) has made this or some variation of the cake. Though I am not much of a History person, I really wanted to know why this cake is made the way it is- Vanilla, Chocolate and Strawberry and why is it called Neapolitan? I did some digging around and came to a satisfactory conclusion.


Neapolitan means "originating from Naples- a city in Italy (known as Napoli in Italian)". The Neapolitan cake is actually derived or rather inspired from Neapolitan Ice-Cream. Yes, the flavors were originally an ice cream. There is no evidence or proof to show that the ice cream originated from Naples. In fact, the ice cream was more famous in Paris than in Italy. But at the time (19th century I gather) the Parisian ice-cream makers were none other than Italians, especially Neapolitans. So, the name. After inventing gelato and ice cream, the ice-cream makers were set with the difficulty of creating something new. They came with the idea of combining different flavors into one ice-cream. The term Neapolitan was generally used to describe any ice cream combining 3 flavors. Initially the flavors used were- Pistachio, Vanilla and Strawberry (or Cherry) to represent the Italian Flag. But as time passed, the more popular flavors at the time took over and became the unofficial Neapolitan flavors. Still, there is no official flavor combination for this intriguing dessert but now the Neapolitan Ice-cream and from that the Neapolitan Cake are known for this trio – Vanilla, Chocolate and Strawberry.


Now that we have the history out of the way, let us dive right into the cake. Ahh! What can I say about the flavors? You need to taste it to know what a divine combination the trio make! Layers of soft and tender sponge cake with flavors of strawberry, chocolate and vanilla bursting through every bite. It is a cake worth making, believe me! Just look at it!! kiss


I used Nutella frosting to frost the cake because the children in the family are huge chocolate lovers and I didn’t wanna overpower the other flavors of the cake by using chocolate frosting. So I settled for Nutella, a win-win. The children were also satisfied and I too felt the frosting complimented the cake in a strange way. But I definitely wanna try it with the custard cream used in the Fondbites recipe. I am sure that would allow us to taste the flavors of the cakes better. For filling the cake, I used the same nutella frosting in one layer and some Cooked flour frosting I had left over from another cake I had made, to take some of the attention away from the nutella..!


You can get the recipes I used in the following links- 

Before I finish up, here is a last tid-bit I found interesting and amusing. The Neapolitan Ice-cream is sometimes known as Harlequin Ice-cream. Why? Harlequin refers to a character who was a jester or clown in an Italian form of theatre art known as “Commedia dell’arte” (comedy of the craft of improvisation). He is usually represented in diamond patterned multicoloured tights. Since the ice-cream is also colorful like the jester, it was called Harlequin Ice-cream!! Isn’t that cool?? Just for reading my post, here is a slice for you to enjoy big grin


Please don’t worry- I have not taken up a sudden liking to History. Just thought I will make the first post for the New Year a little interesting winking Hope you liked reading it as much as I liked gathering the information. 
Until we meet again, keep smiling and Happy baking 
And again A VERY HAPPY NEW YEAR!! party


This has been baked for Fondbites, Bake Along, a group of enthusiastic bakers who bake one recipe every week.


Information I have provided here is taken from a lot sources over a period of time. The main sources being: Of Sugar and SnowA History of Ice Cream MakingCakeSpy, eHow, Wikipedia and a few more.

Monday, 3 November 2014

Avocado-Berry Smoothie


Till date, I have made so many dishes for lunch & dinner and baked a lot. But never have I experimented or tried varieties in drinks, juices or smoothies. Even when I got my hands on some avocado, my intention was to use it in some kind of salad. When I sat with Mr.Google to find the right salad recipe to suit our taste buds, I came across some recipes that used avocado in smoothies. I was intrigued and decided to experiment and make a smoothie.


I felt that Avocado as such doesn't have much taste but it helps in making your smoothie really creamy and oh so luscious! I added each a handful of Raspberries & Blackberries and a couple of pitted dates for sweetness (going the natural way!) along with the flesh of an avocado and gave it a whiz in the blender. The result was a fruit mush, not smoothie :P


At this point it is up to you to decide if you want to add water or milk to your smoothie. For a more creamy texture (albeit a heavier option), add milk else add water. The quantity also is up to you. I added 1 and a half cup water and still winded up with a creamy smoothie :) So just wing it. I absolutely loved the combination of berries with the avocado. And just look at the color. Love!


This creamy and yummy avocado smoothie is very easy to make and its very versatile, in the sense, you can add any fruit you like to the mix. You can use some mango, which seems to be a popular combo with avocado. Or you can add bananas. Its totally your call. And just in case you dont find this sweet enough with the dates, add some honey. It's so not worth it to add sugar at this point.


So that is my first attempt at making a smoothie. And it was a huge success. Will be trying more combinations in the future. Hope you give it a try. You can play around with all kinds of fruits.
Keep smiling :) You just ate healthy ;)

Tuesday, 15 July 2014

Mixed Nuts Streusel Cake

Hi, I'm back with another fabulous recipe from our Bake Along group. For last week, Subhashini chose an Almond Streusel Cake adapted from one of Martha Stewart's recipes. Wikipedia describes Streusel as "a crumbly topping of flour, butter, and sugar that is baked on top of muffinsbreads, pies and cakes". It is a wonderful addition to cakes and takes the taste and texture to a whole new level. 


Although Subhashini has made the streusel with just almonds, I used a mix of Walnuts, Almonds and Pistachios. Walnuts are my most favourite ever, I can eat them all day :D So i had to include them.. 


The cake is baked in a Bundt pan and layered with the Streusel in between and at the top (which will be the finished cake's bottom). If you are confused with this description please head on over to Fondbites website for the step by step recipe with pics ;;)


The crunch of the Streusel pairs so well with the soft and moist cake. Its indescribable. You have to try it to experience it. Yumm yumm yumm..


You can use the glaze for added flavor. I decided to skip it, because i really loved the taste of the streusel and wanted to have the cake as is. By the looks of it, I think I may end up using a lot of this Streusel in the future!! It's so crunchy and perfect!


My bundt pan was not enought for the amount of batter that came out of this recipe, so i made a mini 5-inch cake with the rest of the batter. But i had enough Streusel only for the middle layer and none for the topping. So i just stuck a few choco chips on the top and baked it. Looked so pretty!


Head on over to the recipe and give it a try. You will not be disappointed
Get the recipe here--> Almond Streusel Cake
Happy Baking :x  

This has been baked for Fondbites, Bake Along, a group of enthusiastic bakers who bake one recipe every week.

Thursday, 3 July 2014

Schiacciata

Everyone is afraid of working with Yeast and I am no exception. But lately, I have embraced the fact that yeast is something I will have to get used to working with. As you get good dishes out of it, it will become easier because we are gaining confidence slowly but steadily and once we conquer the so called "Beast" there is no turning back, because bread baking is one of the most satisfying baking there is. All the hard-work we put into kneading, waiting and waiting for it to rise and when it does rise, oh what joy! I still have not conquered the art of working with Yeast but slowly learning and processing.

This week for Fondbites Bake Along, we are doing an Italian bread known as Schiacciata. Fancy word right? But the bread itself is quite simple to make unlike its name ;) Its a flat bread which can be made plain or filled with anything of your liking. I made two versions, one with a simple yet tasty Broccoli Stir Fry and another sweet one with fresh Blackberries and Raspberries..


The prepared Schiacciatas you see in the pic above is before it was baked. I used 50% All purpose flour and 50% Whole wheat flour for the dough. Also, my dough didnt rise as much as I would have liked it to, but it was delicious all the same. For the savory version, I sprinkled some Oregano spice mix on top, after basting it with Olive Oil. 


We had these yummy broccoli slices with homemade Coleslaw- I Grated some beautiful red cabbage, carrots and Onions and mixed them with a Mayonnaise based bread-spread along with some mustard, vinegar, pepper and palm sugar to balance the sourness of all the above. Delicious combo!!


Moving on to the the dessert :D My Hubby got these beautiful fresh Blackberries and Raspberries from a trip to Dubai and I just couldnt resist using it. I just had to see those beauties in something. Although maybe it was not such a great idea because the berries kind of soaked the bread with their juices but it was delicious nonetheless, so no regrets! I mixed the berries with 3 tablespoons of sugar and let them sit for sometime and then filled the prepared Schiacciata with it. Look at all the juice that has oozed out. Oh.. Luscious!! 


We just had the slices as is, but it could have used more sweetness since the berries were quite tart. In case you choose to opt for this filling, do add more sugar to the berry mix or you can have these delicious slices with vanilla ice cream or some whipped cream. That's the way to go- Whipped cream. I can just imagine eating these with that..Sigh!


Hope I have helped you atleast a little to nudge you along the Yeast Street. Do try the recipe out. And play with the fillings. These versions I made are just 2 drops in the big ocean of fillings you can work with.

Get the recipe here -> Onion Tomato Schiacciata
Until next time, Keep Smiling and Happy Baking :)

This has been baked for Fondbites, Bake Along, a group of enthusiastic bakers who bake one recipe every week.