
This cake was submitted in April 2015 for Fondbites Bake Along's "Bake It Perfect" contest under the "Flavourful Cakes" categories. And I'm very happy to report that my entry was selected among the 12 finalists. I have submitted my entry for the finals. Will reveal that post soon after the results are announced ...
So far my experience with inventing and doing new flavour combinations has been quite low. I do like to browse and save some unique recipes and unusual flavors especially in pinterest but haven’t really got down to baking all of them. I own quite a lot of books too. So, when I saw the contest post on Fondbites Bake Along group for “Flavorful Cakes” I decided then and there to participate and finally come up with my combination and make use of all those books and sources I have.

After a lot of thinking, going through my books, pins, bookmarks and saved recipes, I realized how wide the selection is!! I wanted to make something simple yet yummy and also something my family would enjoy. Finally zeroed in on 3 components from 3 different sources and put them together. My entry is a Coconut Cake with Apricot & Citrus Custard Filling and a Matcha floavoured Swiss Meringue ButterCream (SMBC) frosting..

The cake in itself is a hearty and wholesome cake with just enough sweetness to satisfy us and the subtle flavour of rum just enhances the whole coconuty taste that is thrown at us like a bomb with the addition of coconut milk as well as toasted coconut. It is not a sponge cake recipe so its not really soft, it is more like a tea time cake(on its own). I have made a few changes to the original recipe but nothing too drastic. The Filling is a tangy one, in contrast with the sweet coconut cake and I was very satisfied with the way it turned out. The frosting could have been anything if you ask me, but the subtle and almost non-existent bitterness of the Matcha was so perfect and made the cake complete!
The whole cake takes a bit of time but with proper planning, it is fairly easy to make. I have tried my best to give proper steps as to how to go about the whole process. Hope it is helpful. So let’s get on with it..

Coconut Cake:
Recipe adapted from Dorie Greenspan- Baking- From my Home to Yours
INGREDIENTS:
All Purpose Flour – 2 Cups
Baking Powder – 1 Tsp
Pinch of Salt
Unsweetened Coconut Milk – 1 cup/ 200ml
Unsalted Butter – 4 Tblsp
Eggs – 4
Granulated Sugar – 1 Cup
Light Brown Sugar – 1 Cup (loosely, not tightly packed)
Vanilla Extract – 1 Tsp
Dark Rum – 2 Tsp (Purely optional)
Shredded Fresh Coconut – ¾ cup (Desiccated Coconut can also be used)
METHOD
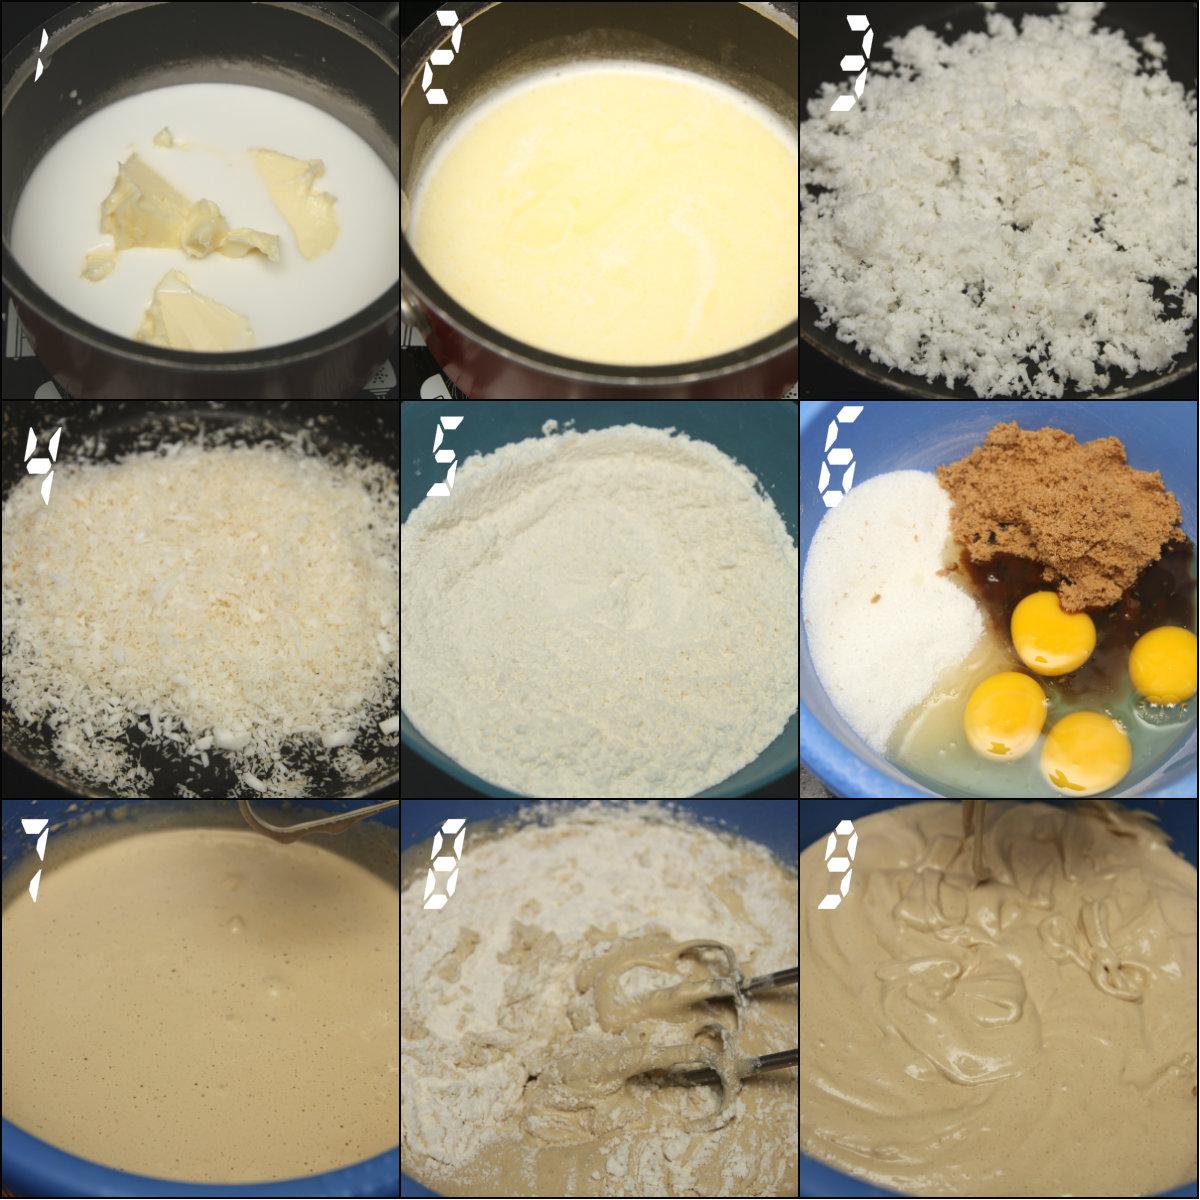
-Take a small saucepan, pour in the coconut milk and add the butter. Heat it until the butter is fully melted. You don’t have to boil it. (Pic 1& 2) Remove from heat and set aside, but keep it warm. Do not cool it completely.
-Take the scraped fresh coconut in a non-stick pan and toast it on low flame until all the moisture is gone and the coconut turns golden yellow. Be careful not to burn the coconut. (Pic 3 & 4)
-In a clean dry bowl, sift together all purpose flour, baking powder and salt. (Pic 5)
- In another large bowl (or in the bowl of your stand mixer) combine the eggs and both the sugars and beat on med-hi speed until the mixture is pale, thick and doubled in volume. (Pic 6 &7)
-Add the vanilla extract and dark rum and beat well.
-Add all purpose flour and beat on low speed just until the flour is fully combined. Do not over beat. (Pic 8 &9)
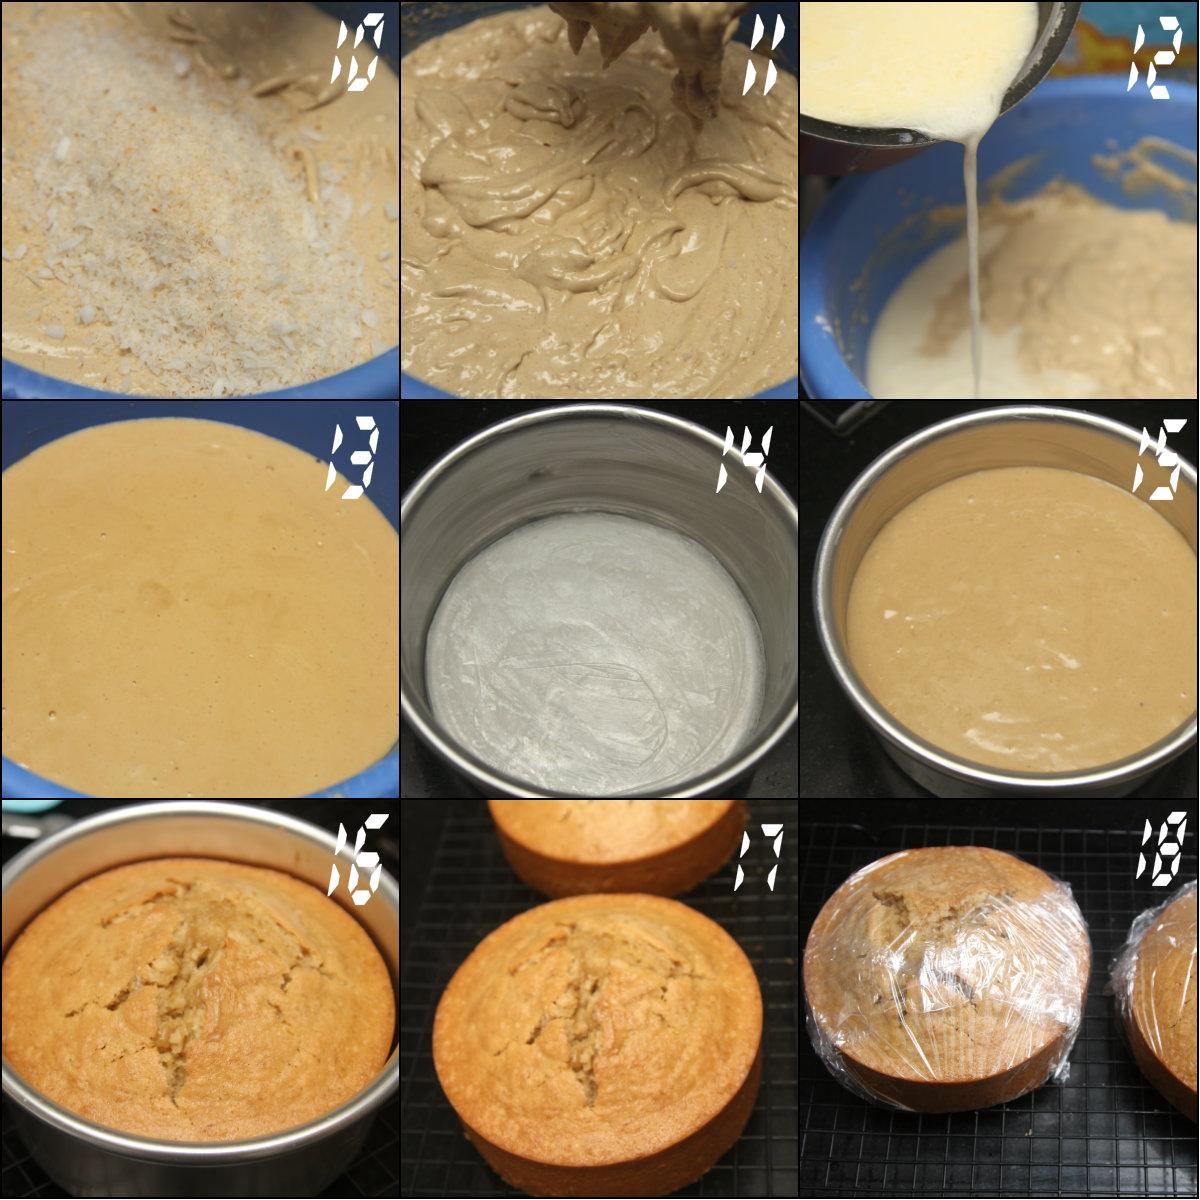
-Add in the toasted coconut and again beat on low only until its mixed thoroughly (Pic 10 & 11)
-Pour in the hot coconut milk-butter mix slowly but steadily and keep beating until it’s all in and the mixture looks smooth. (Pic 12 & 13) Scrape the sides and bottom of the bowl and stir everything together with a spatula.
-Preheat your oven to 180*C and prepare your pans. I wanted a tall cake, so I used a 6” round pan and since I have only one, I had to bake it twice. (Pic 14)
-Pour the batter in and bake for 50-55 mins, time may vary with pan size. (Pic 15 & 16)
-Cool the cakes on wire racks. And cling wrap them and refrigerate once completely cool. (Pic 17 & 18)
Apricot Citrus Custard Filling
Recipe courtesy- Joy of Cooking
INGREDIENTS:
For the apricot puree:-
Dried Apricots – ½ cup
Water – 1 cup
Sugar – 1 Tblsp
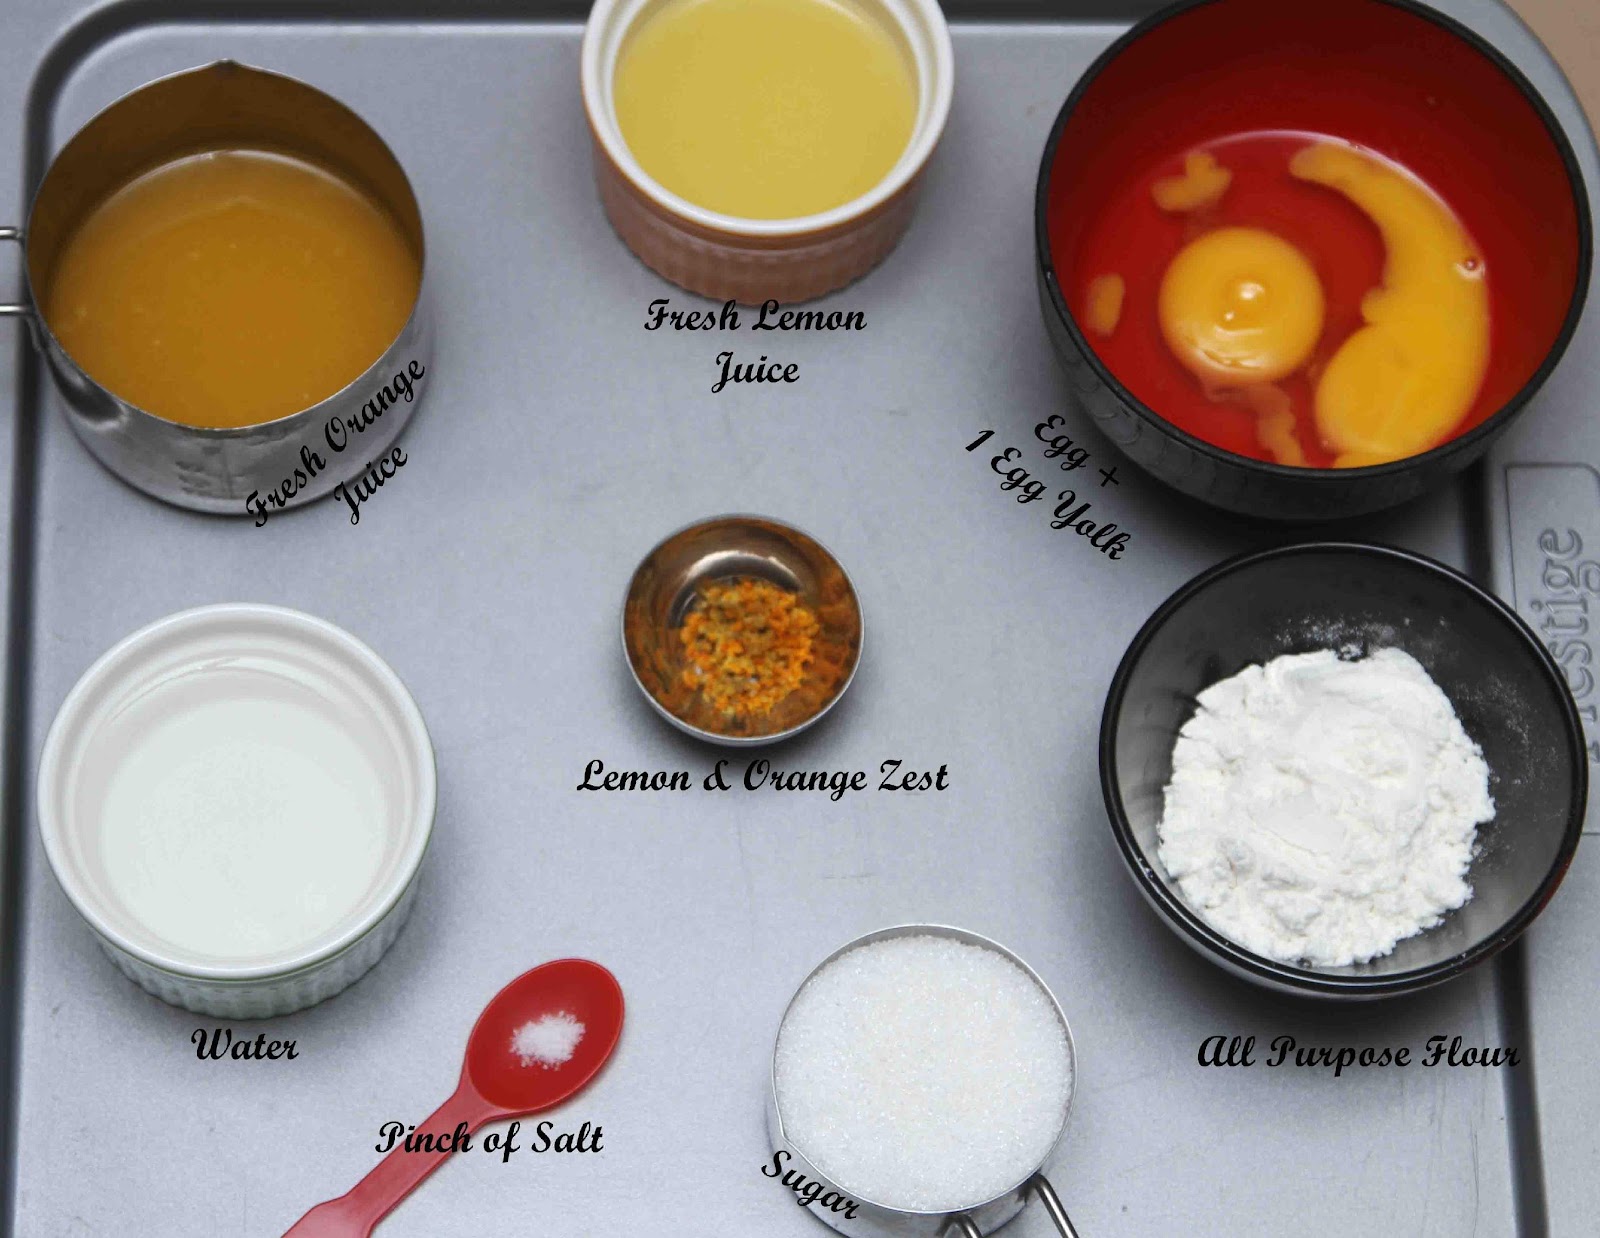
For the custard base:-
Zest of 1 Lemon and ½ an Orange
Fresh Orange Juice – ½ Cup
Fresh Lemon Juice – 3 Tblsp
Water – 3 Tblsp
Sugar – 1/3 Cup
All Purpose Flour – 2 Tblsp
1 Egg + 1 yolk
METHOD:
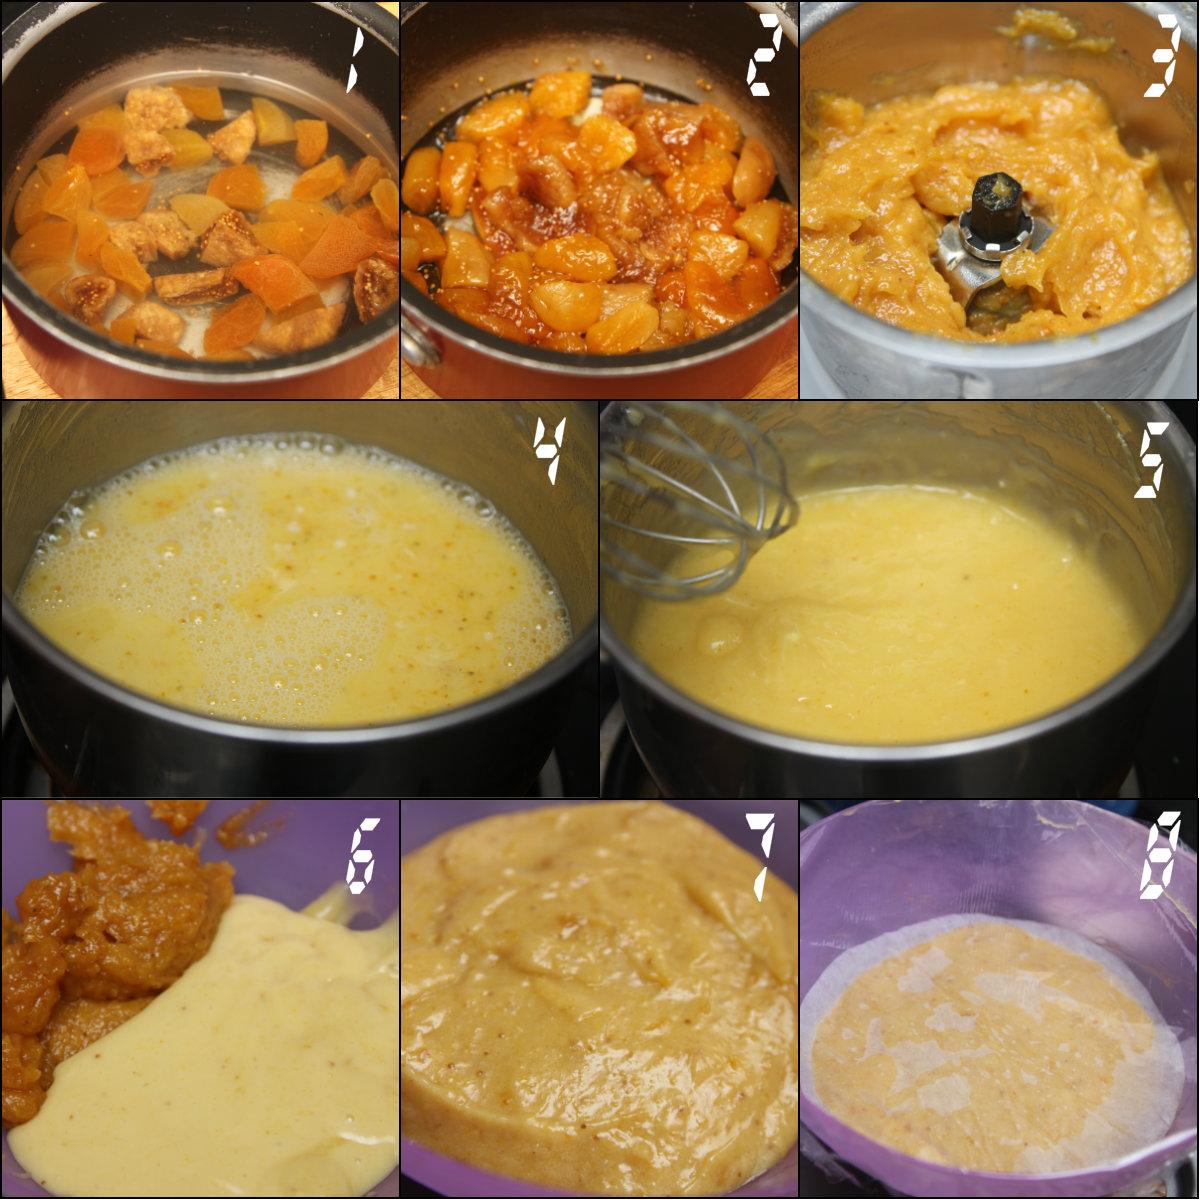
-In a small saucepan, combine the dried apricots and water. Simmer on low flame for about 20 to 25 mins. (Pic 1)
-Stir in the Sugar and continue to cook in low flame until the remaining liquid has turned into a glaze. This will take around 3-5 min. (Pic 2)
-Cool the mixture and puree it in your blender and set aside (Pic 3)
-In another saucepan, combine all the ingredients listed under “For the Custard Base”. Cook in medium flame, whisking constantly. Be careful as this burns really fast, so don’t take your eyes and hands off this. (Pic 4)
-Cook until the mixture has thickened and starts to bubble. Cook for 1 more minute, don’t stop whisking. Remove from heat. (Pic 5)
-Scrape the whole mixture into a big sieve and strain it into a bowl. You will have to push it through the sieve as it will be quite thick.
-To this add the pureed apricots and mix well. (Pic 6 & 7)
-Cover the surface of the filling with a wax/baking paper, cling wrap it and refrigerate. (Pic 8)
Matcha Swiss Meringue Buttercream:
Recipe adapted from Martha Stewart
INGREDIENTS:
Egg Whites – 5
Sugar – 1 ¼ Cups
Unsalted Butter – 340 g (cut into tablespoons)
Matcha Powder – 2 Tblsp (adjust according to taste)
A few drops of Vanilla Extract
METHOD:
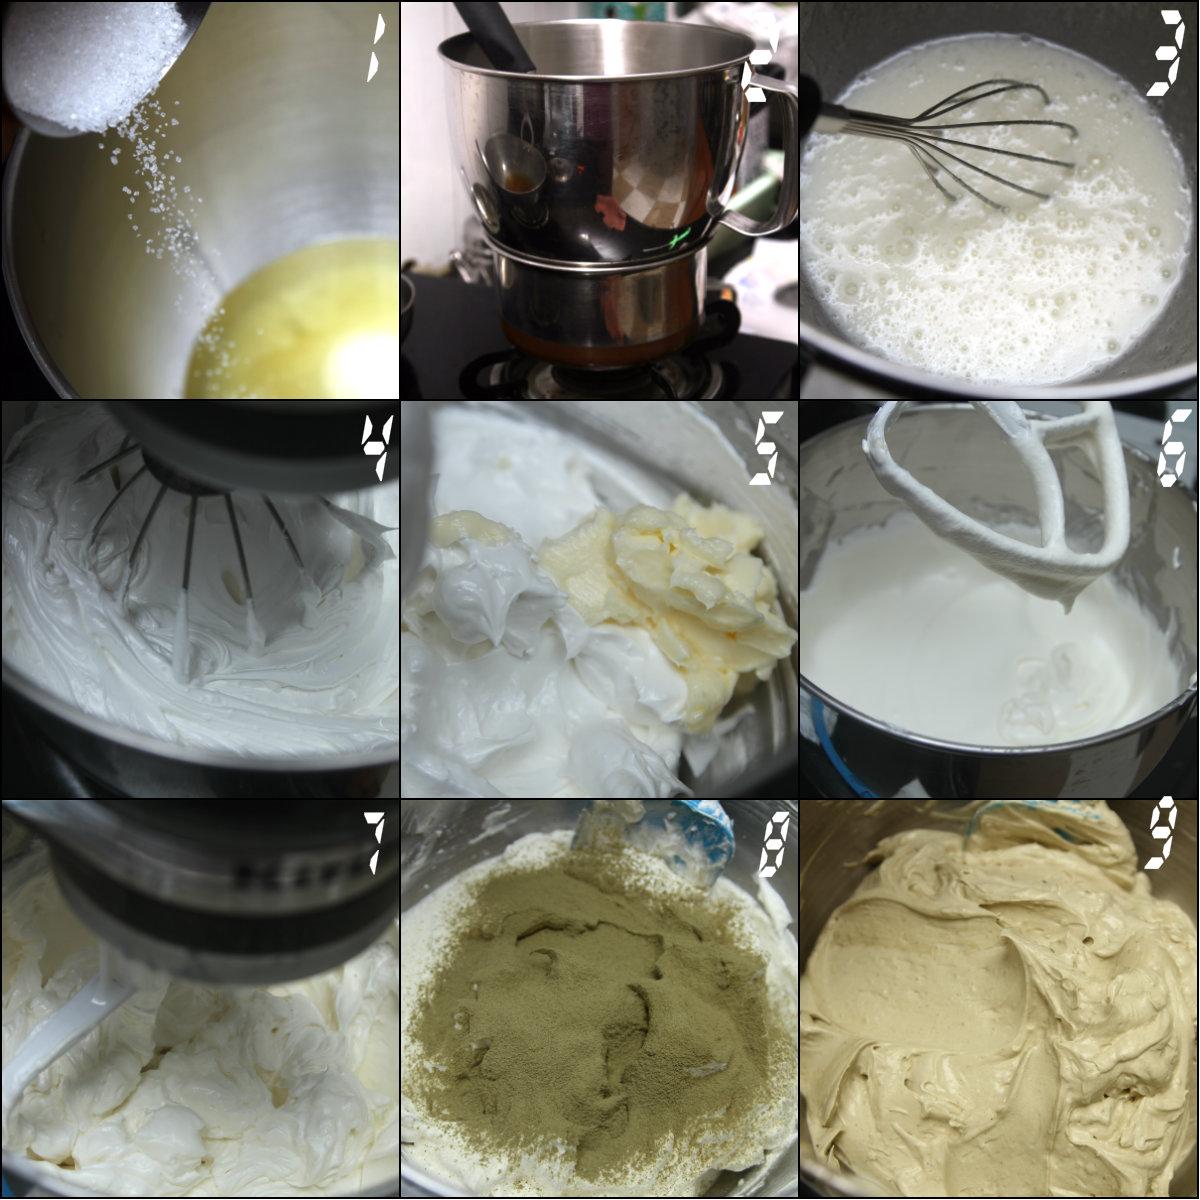
-In the bowl of your stand mixer, combine egg whites and sugar (Pic 1)
-Place this over a pan of simmering water and ensure that the bowl is not touching the water (Pic 2)
-Cook, whisking constantly until the sugar has dissolved. The mixture should be warm to touch (160F or abt 70C) and completely smooth when rubbed between your index and thumb finger. Remove from heat. (Pic 3)
-Attach the bowl to the mixer and beat the mixture on high speed with the whisk attachment, until it holds stiff peaks. Continue beating for another 6 minutes. (Pic 4)
-Change to the paddle attachment and start beating in med speed, adding the butter several tablespoons at a time. Beat well after each addition. (Pic 5)
-After the addition of all the butter, the mixture may look curdled and soupy, mine did. (Pic 6) Just beat the mix in high speed for about 3 mins and will come to the correct consistency. Don’t worry. (Pic 7)
-Add the vanilla extract and sift in the matcha powder. Beat until well combined. (Pic 8 & 9)
-Beat the whole mixture in low speed to eliminate any air bubbles (I missed this step and ended up with a lot of air pockets in my frosting bag, so don’t skip this) The buttercream will be like satin.. So smooth and shiny!

-I split the buttercream into 2 batches and coloured one batch with 3-4 drops of green gel color. Just for a variation for the design. I left one batch as it is since the matcha had given a nice pastel shade of green and I wanted to show that.
-I split the buttercream into 2 batches and coloured one batch with 3-4 drops of green gel color. Just for a variation for the design. I left one batch as it is since the matcha had given a nice pastel shade of green and I wanted to show that.
ASSEMBLY:

-Take the cakes and filling from the refrigerator. Slice the domed tops and torte both the cakes.
-Take the cakes and filling from the refrigerator. Slice the domed tops and torte both the cakes.
-Place one half of the cakes on a cake board or a cake stand.
-Take a piping bag and cut the top of a little. Fill it with a little frosting and pipe a dam around the cake.
-Fill the rest with the filling and place another half of the cakes. Repeat. And repeat again.
-Crumb coat the cake and refrigerate. Decorate the cake as your mind wishes.
Hope you liked my Flavor Combination idea and my first detailed post with steps and pics. I am very glad I did this post. I feel really happy with the way everything turned out. Hope to do many more bakes like this ☺
Hope you liked my Flavor Combination idea and my first detailed post with steps and pics. I am very glad I did this post. I feel really happy with the way everything turned out. Hope to do many more bakes like this ☺

Here is one last slice for you!!

Happy Baking!!
No comments:
Post a Comment